Blackstone Philly Cheesesteak Recipe (Easy Griddle Guide)
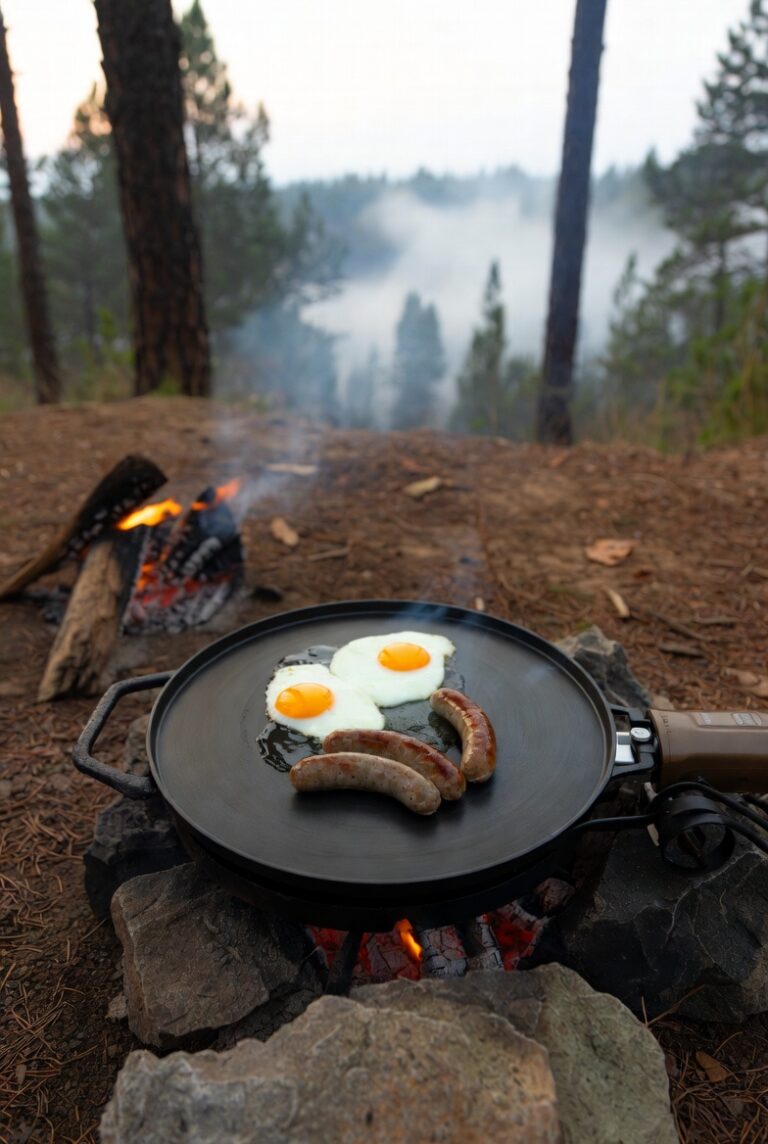
Look, I’m just going to say it: the Philly cheesesteak might be the single best thing I’ve made on my Blackstone since I got it this spring. And I’ve made a lot of stuff. There’s something about that flat top heat that does things to the meat and onions that you just can’t replicate in a pan on your stovetop. The crust you get, the way the cheese melts into everything, how all those juices spread out and caramelize… it’s legitimately better than most restaurant versions I’ve had. Sierra took one bite and immediately asked when I was making them again. Even Bronco and Gunner were going absolutely insane, which granted, happens every time I fire up the griddle, but this time felt different. This was pure beef and cheese chaos in the best possible way.
The thing about Philly cheesesteaks on a Blackstone is that you’ve got all this space to work with. You can have your onions going in one zone, your meat in another, and you’re toasting the rolls right there on the same surface. Everything comes together at the same time. It’s efficient and it just makes sense. I’m still figuring out all the tricks, but I’ve made these a few times now and I’m ready to share what’s been working.
Blackstone Philly Cheesesteak
Ingredients
Method
- Prep all ingredients before turning on the griddle — slice meat, onions, peppers, and have cheese and rolls ready to go.
- Preheat Blackstone to medium-high heat (around 400°F) for a full 10 minutes.
- Add 2 tbsp vegetable oil to one section of the griddle. Add sliced onions and a pinch of salt. Cook 8-10 minutes, stirring occasionally, until soft and caramelized. Add peppers and/or mushrooms if using.
- Add remaining 1 tbsp oil to a separate section of the griddle. Spread ribeye out in a thin layer — don't pile it. Season immediately with salt and pepper and add Worcestershire sauce.
- Use your spatula to chop and move the meat continuously while it cooks, about 4-5 minutes, until browned with crispy bits.
- Combine meat and onions into 4 equal piles on the griddle.
- Place 2 slices of provolone on each pile. Cover with a basting dome if available and let melt for about 1 minute.
- Butter the inside of hoagie rolls and toast butter-side down on a clean section of the griddle for about 2 minutes until golden brown.
- Scoop each meat and cheese pile into a toasted roll, press down gently, and serve immediately.
Notes
- Freeze your ribeye for 45 minutes before slicing for much cleaner, thinner cuts — or ask your butcher to slice it for you.
- Season meat when it hits the griddle, not before — salting early draws out moisture and prevents browning.
- Don't skip toasting the rolls — it creates a barrier that keeps them from getting soggy.
- Cheez Whiz is a valid and authentic alternative to provolone. No judgment here.
Why the Blackstone Makes Better Cheesesteaks
Here’s what I’ve learned in the short time I’ve been doing this: that flat top surface gives you way more contact with the meat than a regular grill ever could. When you’re cooking a cheesesteak, you want that beef to get some color on it while staying tender. The Blackstone lets you spread everything out thin, get it caramelized, and keep it from steaming in its own juices like it would in a pan. Plus, you’ve got the room to chop and mix everything right there on the surface. It’s like having a diner griddle in your backyard.
Ingredients
This makes 4 legitimately sized cheesesteaks. Don’t try to stretch it to 6 unless you want sad, skinny sandwiches.
For the Sandwiches:
- 2 pounds ribeye steak, sliced as thin as humanly possible (more on this below)
- 2 large yellow onions, sliced thin
- 1 green bell pepper, sliced thin (optional, and yes, I know this is controversial)
- 8 slices of provolone cheese (or Cheez Whiz if you’re going authentic Philly-style)
- 4 hoagie rolls
- 4 tablespoons butter, divided
- 3 tablespoons vegetable oil
- Salt and black pepper
- 1 tablespoon Worcestershire sauce
Optional Toppings:
- Mushrooms, sliced
- Hot peppers
- Jalapeños
- Extra cheese because why not
The Meat Situation: This Matters More Than You Think
Okay, so here’s where I messed up the first time. I bought ribeye steaks and tried to slice them at home with my regular kitchen knife. It was a disaster. The slices were thick and uneven and the whole thing was frustrating. Here’s what actually works: ask your butcher to slice the ribeye thin for you, like sandwich-thin. Most places will do this if you ask nicely. Or, and this is what I’ve been doing, stick the ribeye in the freezer for about 45 minutes before you slice it. Not frozen solid, but firm enough that your knife can get through it cleanly. You want slices about 1/8 inch thick if you can manage it.
Why ribeye? Because it’s got the fat content that keeps everything juicy and gives you that authentic cheesesteak flavor. You could use top round or sirloin if you want to save money, and honestly, it’ll still be good. But ribeye is the move if you want it to taste like it came from South Philly.
Step-by-Step Instructions
Step 1: Prep Everything First
Get all your ingredients prepped before you turn on the griddle. This is not the time to be slicing onions while your meat is cooking. Have your meat sliced and ready in a bowl. Onions and peppers sliced and in another bowl. Cheese sliced or Cheez Whiz ready to go. Rolls standing by. I keep my sauces and oils in a set of squeeze bottles right next to the griddle for easy access. Trust me on this. Once things start moving on that flat top, they move fast.
Step 2: Preheat Your Blackstone
Turn your Blackstone on to medium-high heat. I usually set mine somewhere between medium and high, closer to the high side. You want the temperature around 400 degrees. Let it preheat for a good 10 minutes. I’ve learned that rushing the preheat is a mistake. You need that whole surface evenly hot. I use a dual probe infrared thermometer to check the temp in different spots to make sure everything is where it needs to be.
Step 3: Start With the Onions
Add about 2 tablespoons of vegetable oil to one section of the griddle. Throw your sliced onions on there and spread them out. Add a pinch of salt. You’re going to cook these for about 8-10 minutes, stirring occasionally with your spatula. You want them soft and starting to brown. If you’re using peppers, add them in with the onions. If you’re adding mushrooms, those go in now too.
Here’s a tip I picked up: don’t mess with them constantly. Let them sit for a minute or two between stirs so they actually caramelize instead of just steaming. The Blackstone has hot spots and cooler spots, so move things around to manage how fast they’re cooking.
Step 4: Cook the Meat
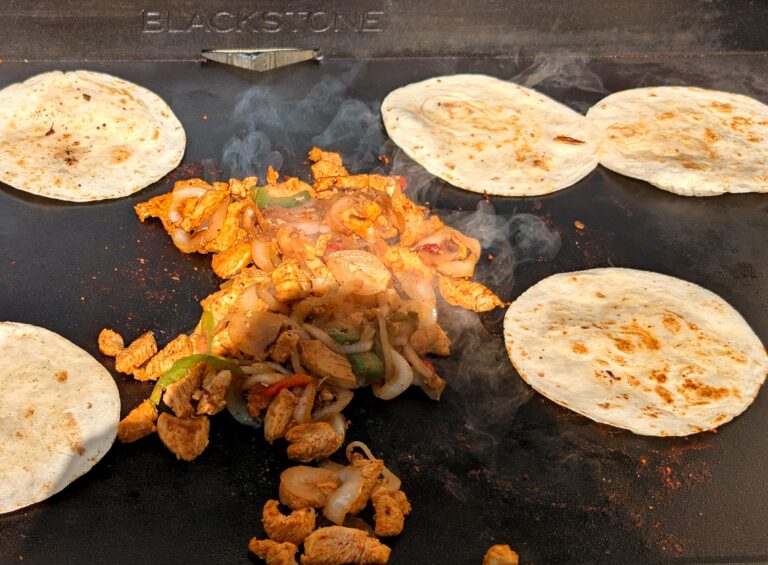
Once your onions are going and looking good, add another tablespoon of oil to a different section of the griddle. Add your sliced ribeye. Now, this is important: don’t just plop it all down in a pile. Spread it out. You want as much meat touching the griddle surface as possible.
Season it immediately with salt and pepper. Add the Worcestershire sauce and spread it around with your spatula. Now here’s the fun part: use your spatula to chop the meat right there on the griddle. Keep it moving, keep it chopping, keep it spreading out. You want it to brown but not dry out. This takes maybe 4-5 minutes total. The meat should be cooked through with some nice browned crispy bits.
The smell at this point is unbelievable. This is when my dogs completely lose it.
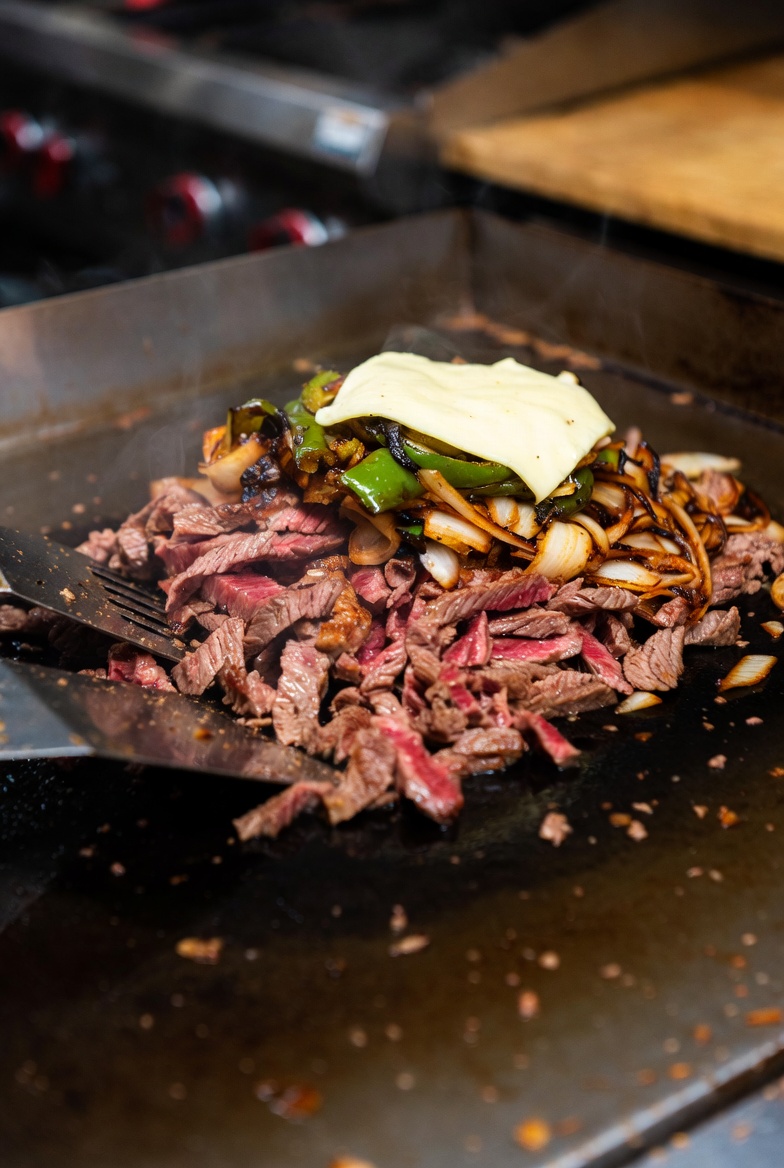
Step 5: Combine Everything
Once your meat is cooked and your onions are caramelized, push them together into 4 separate piles on your griddle. Each pile is going to become one sandwich, so make them roughly equal. Mix the onions into the meat piles.
Step 6: Add the Cheese
Put 2 slices of provolone on each pile of meat and onions. If you’re using Cheez Whiz, squirt it on now. I’ve done both. The provolone is what I prefer because it’s what I grew up with, but I’m not going to argue with anyone about cheese choices. That’s a personal thing.
Let the cheese melt for about a minute. If it’s not melting fast enough, you can use a basting cover to trap the heat. I picked one up after my second attempt at these and it makes the cheese melt perfectly every time.
Step 7: Toast the Rolls
While the cheese is melting, butter the inside of your hoagie rolls. Put them butter-side down on a clean section of the griddle. Toast them for about 2 minutes until they’re golden brown. This step is not optional. A soggy roll will ruin an otherwise perfect cheesesteak. The butter and the toasting create a barrier that keeps the roll from getting destroyed by all those juices.
Step 8: Assemble
Use your spatula to scoop each meat and cheese pile into a toasted roll. Press it down a bit so everything settles in. Serve immediately.
Pro Tips I’ve Learned
Here’s what’s been working for me after making these a handful of times:
- Temperature control is everything: If your griddle is too hot, the meat will dry out before the onions are done. If it’s too cool, everything steams instead of caramelizes. That 400-degree zone has been the sweet spot for me.
- Oil management: Don’t drown everything in oil, but don’t be stingy either. You need enough to keep things from sticking and to help with the browning. I keep a squirt bottle of vegetable oil right next to the griddle.
- The rolls matter: Get actual hoagie rolls or sub rolls from a bakery if you can. The grocery store hot dog buns aren’t going to cut it. You need something with structure that can hold up to all that meat and juice.
- Cheese choices: I’ve tried provolone, American, and Cheez Whiz. They all work. Provolone gives you that stretch, American melts smooth, Whiz is pure nostalgia. Pick your favorite and don’t let anyone tell you you’re wrong.
- Let your griddle do the work: Don’t overthink it. The flat top surface is naturally good at this. Just keep things moving and pay attention to what’s happening.
Common Mistakes to Avoid
I’ve made most of these mistakes myself in the past few weeks, so learn from my failures:
Meat Cut Too Thick
This was my first attempt. Thick meat doesn’t cook right for a cheesesteak. It ends up being more like steak pieces in a sandwich instead of that classic cheesesteak texture where everything melds together. Get it sliced thin or don’t bother.
Not Preheating Long Enough
I was impatient one time and started cooking after maybe 5 minutes of preheat. Everything cooked unevenly and stuck to the surface in spots. Take the full 10 minutes. Go grab a beer, check on the dogs, whatever. Just let it preheat.
Overcrowding the Meat
If you pile all the meat in one spot, it steams instead of searing. Spread it out. You’ve got a 36-inch griddle, use that space. That’s the whole point.
Forgetting to Season
Season your meat when it hits the griddle, not before. If you season it sitting in a bowl, the salt draws out moisture and you end up with wet meat that won’t brown properly. Hit it with salt and pepper right when it hits the hot surface.
Skipping the Roll Toast
I know I already mentioned this, but seriously, toast your rolls. It takes two minutes and makes a massive difference. A soggy roll will completely ruin the experience.
Frequently Asked Questions
Can I use a different cut of beef?
Yeah, absolutely. Ribeye is traditional and has the best fat content, but top round and sirloin both work. You could even use chicken if you want to do a chicken cheesesteak variation. Just slice it thin and cook it the same way.
Do I have to use peppers?
No. This is actually a whole thing in Philadelphia. Apparently, tourists get peppers and locals don’t, or something like that. I like them, Sierra doesn’t, so I make half with and half without. Do whatever makes you happy.
What temperature should the griddle be?
Around 400 degrees. Medium-high heat. If you don’t have a thermometer, you should be able to hover your hand about 6 inches above the surface for maybe 3-4 seconds before it gets uncomfortable. That’s not scientific, but it’s worked for me.
Can I prep the meat ahead of time?
You can slice it ahead of time and keep it in the fridge, sure. Just let it come closer to room temperature before cooking, maybe 20 minutes out of the fridge. Cold meat straight from the fridge doesn’t brown as well.
How do I clean the griddle after all that cheese?
While the griddle is still hot, scrape off the big chunks with your spatula. Then add some water to steam off the stuck bits. Scrape again. Once it’s cooled down a bit but still warm, do your regular cleaning routine. The cheese comes off easier than you’d think if you deal with it while things are still hot.
Can I add other toppings?
Go nuts. Mushrooms are great. Hot peppers, jalapeños, even banana peppers work. Some people put marinara sauce on theirs, which sounds weird but is apparently a thing called a pizza steak. I haven’t tried that yet, but I’m curious.
What sides go with these?
I’ve been doing fries on the griddle right after the sandwiches. Just frozen fries spread out on the flat top work great. Or chips. Or nothing because these sandwiches are pretty substantial on their own.
Variations Worth Trying
Once you’ve got the basic version down, here are some things I want to try or have already experimented with:
Pizza Cheesesteak
Add marinara sauce and mozzarella cheese instead of provolone. I’m told this is a real thing in Philly.
Buffalo Chicken Cheesesteak
Use sliced chicken instead of beef, toss it in buffalo sauce, use blue cheese or ranch. This is on my list for next week.
Breakfast Cheesesteak
Same concept but add scrambled eggs to the meat and cheese. Maybe some hot sauce. Could be amazing.
Final Thoughts
Here’s the thing about making Philly cheesesteaks on a Blackstone: it’s really hard to screw up once you understand the basic principles. Get your meat sliced thin, get your griddle hot, don’t overcomplicate it. The flat top does most of the work for you. That even heat distribution and the massive cooking surface means you can knock out four sandwiches at once without breaking a sweat.
Since getting my Blackstone this spring, I’ve made these maybe four or five times now, and they get better each time as I figure out little adjustments. The temperature management, the timing on the onions, how much to chop the meat, when to add the cheese. It’s all pretty intuitive once you do it once or twice.
These have become Sierra’s favorite thing I make on the griddle, which is saying something because I’ve been cooking on this thing constantly. There’s just something about a proper cheesesteak that hits different, especially when you’ve got all that caramelized crust and melted cheese happening. And doing it outside on the Blackstone means your kitchen doesn’t smell like onions for three days, which is a serious bonus.
If you’ve been thinking about making cheesesteaks on your Blackstone, just do it. Get some ribeye sliced thin, grab some hoagie rolls, and fire it up. It’s one of those things that seems more complicated than it actually is. And once you nail it, you’re going to be making these all the time. Fair warning: your dogs will never leave you alone when the griddle is on. Bronco and Gunner have now associated the sound of the igniter clicking with the possibility of fallen beef, and they post up like they’re on a stakeout.
The whole meal comes together in about 30 minutes including prep, and that’s with me still figuring things out. You’ll probably be faster. Give it a shot and let me know how it goes.