Blackstone Smash Burgers Recipe – Crispy Perfect Burgers
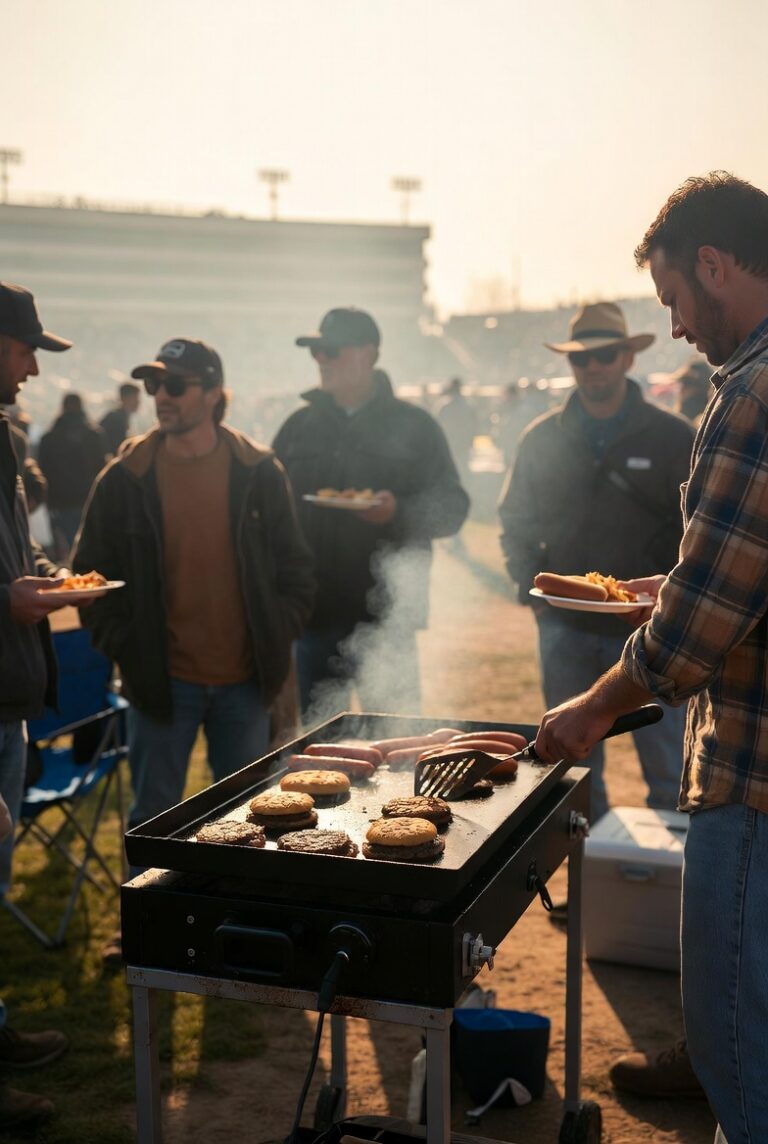
Okay, so I need to tell you about the burger revelation that happened in my backyard last weekend. I’m talking about smash burgers on my Blackstone griddle, and honestly, I don’t think I can ever go back to regular burgers again. I got my 36-inch Blackstone back in April, and I’ve been experimenting like crazy ever since. But these smash burgers? This is the thing that made Sierra look up from her phone and say “whoa, what did you just do to that burger?” And when Bronco and Gunner started doing their griddle dance in the backyard, losing their absolute minds at the smell, I knew I’d unlocked something special. The crust on these things is insane. Like, crispy-edged, caramelized, juice-dripping-down-your-arm good. And the best part? They’re actually easier than regular burgers once you get the hang of it.
Blackstone Smash Burgers
Ingredients
Method
- Divide ground beef into 8 equal 4-ounce balls, rolling loosely — don't pack tight
- Preheat Blackstone to high heat for 10-15 minutes until surface reaches 450-500°F
- Add a thin layer of neutral oil to the cooking surface
- Place beef ball on griddle and immediately smash flat within 1-2 seconds using a spatula or burger press
- Season with salt and pepper immediately after smashing
- Cook without touching for 2-3 minutes until edges are crispy and deeply browned
- Flip, add a slice of American cheese immediately, cook for 60-90 seconds more
- Toast buns face-down on the griddle for 30 seconds until golden brown
- Assemble and serve immediately
Notes
- Use 80/20 ground beef only — the fat is essential for that crispy crust; lean beef will give you dry, disappointing results.
- You only get one smash — do it within the first 1-2 seconds of the meat hitting the griddle or you'll lose the crispy edge effect.
Why Smash Burgers on a Blackstone Are a Total Game Changer
Here’s the deal. Traditional grilled burgers are fine, whatever. But smash burgers take advantage of something called the Maillard reaction, which is just a fancy way of saying “you’re getting maximum contact between meat and screaming hot metal, creating flavor that’ll make you question every burger you’ve ever eaten.” The Blackstone’s huge flat surface area is literally perfect for this because you get consistent heat across the entire cooking surface. No hot spots, no flare-ups, just pure burger-searing power.
I’ve been making these at least twice a week since I figured out the technique, and I’m still in that phase where I want to tell everyone about it.
What Makes a Smash Burger Different
So before we get into the actual recipe, let me explain what we’re doing here. A smash burger is exactly what it sounds like. You take a ball of ground beef, you put it on a super hot griddle, and you literally smash it flat with a spatula or burger press. The smashing creates these lacy, crispy edges while keeping the inside juicy. The key is high heat and aggressive smashing within the first few seconds of the meat hitting the griddle.
Regular burgers? You’re supposed to never press them down, right? Flip that entire concept on its head. We’re going full caveman mode here, and it’s glorious.
Ingredients for Blackstone Smash Burgers
This is where smash burgers get really beautiful because the ingredient list is stupidly simple. You don’t need fancy stuff. In fact, fancy stuff might actually hurt you here.
For the Burgers
- 2 pounds ground beef (80/20 blend, this is crucial)
- Salt (kosher salt works great)
- Black pepper
- 8 burger buns (I like potato buns but use whatever makes you happy)
- 8 slices American cheese (yeah, I said it, American cheese is the move here)
- Neutral oil for the griddle (vegetable or canola)
For the Toppings
- Sliced onions
- Pickles
- Lettuce
- Tomato
- Ketchup
- Mustard
- Mayo
- Special sauce if you’re feeling fancy (I just mix mayo, ketchup, and some pickle juice)
Notice what’s NOT in the burger ingredient list? No egg, no breadcrumbs, no worcestershire sauce, no chopped onions mixed in. Just beef, salt, and pepper. That’s it. We’re letting the beef and that gorgeous crust do all the talking. I keep my condiments in restaurant squeeze bottles for easy application and they make the whole assembly process so much cleaner and more controlled.
The Critical 80/20 Ground Beef Rule
Let me save you from a mistake right now. Do NOT use lean ground beef for smash burgers. I don’t care if you’re trying to be healthy or whatever. Use 80/20 ground beef, which means 80% lean and 20% fat. That fat is essential for flavor and for creating the crust. I tried 90/10 once because that’s what Sierra brought home from the store, and it was sad and dry and I was genuinely disappointed in myself.
The fat renders out onto the griddle surface and essentially fries the burger while it cooks. It’s not healthy, but it’s honest, and honestly, it’s incredible.
Equipment You’ll Need
Obviously you need your Blackstone griddle. I’m using my 36-inch model, which gives me room to cook like six burgers at once, which is perfect when friends come over and I want to show off.
Here’s what else you need:
- A heavy-duty metal spatula (the one that came with my Blackstone works great)
- A burger press or a second spatula for smashing
- A squirt bottle with water for any flare-ups or for steaming the buns
- A meat thermometer if you’re nervous, but honestly you won’t need it
- Parchment paper squares (optional but helpful for portioning)
Step-by-Step Blackstone Smash Burger Instructions
Alright, here we go. This is the exact process I’ve been using since I figured this out a few weeks ago, and it’s been working perfectly every single time.
Step 1: Prep Your Meat
Take your 2 pounds of ground beef and divide it into 8 equal portions. Each portion should be about 4 ounces, which is a quarter pound. Here’s my method: I weigh them on a kitchen scale because I’m slightly neurotic about this stuff, but you can totally just eyeball it if you want.
Roll each portion into a loose ball. And I mean loose. Don’t pack it tight like you’re making a meatball. Just gently form it into a ball shape. If you pack it too tight, it won’t smash properly and you’ll lose that crispy edge potential.
Put the balls on a plate or tray with a little space between them. Some people put parchment paper squares under each ball to make them easier to transfer to the griddle. I don’t bother with this anymore but it’s helpful when you’re learning.
Step 2: Preheat Your Blackstone
This is where a lot of people mess up. You need HIGH heat for smash burgers. Like, higher than you think. I turn all the burners on my Blackstone to high and let it preheat for at least 10 to 15 minutes. You want that surface screaming hot.
The ideal temperature is around 450 to 500 degrees Fahrenheit. If you drop some water on the surface, it should sizzle and evaporate almost instantly. That’s how you know you’re ready. I actually use my dual probe infrared thermometer to check the surface temp because it takes the guesswork out of it completely.
While it’s heating up, Bronco and Gunner are already starting their whole routine, circling the back door and whining because they know what’s coming. Those dogs have Pavlovian conditioning for the sound of my Blackstone firing up at this point.
Step 3: Oil the Griddle Surface
Once your griddle is fully preheated, add a thin layer of neutral oil across the cooking surface. I use vegetable oil from a squirt bottle and just do a light coating where I’m planning to cook the burgers. You don’t need a ton, just enough to prevent sticking and help with that crust formation.
Step 4: The Smash
Okay, this is the moment. Place a ball of beef on the hot oiled griddle. Immediately, and I mean within one or two seconds, press down HARD with your spatula or burger press. You want to smash it down to about a quarter inch thick, maybe even a little thinner. Use some force here. Don’t be shy about it.
The first time I did this, I was too gentle and it didn’t work right. You really need to commit to the smash. If you have a burger press like the cast iron smash burger press, great. If not, use the back of a sturdy spatula and just lean into it. Some people use a second spatula on top of the first one for extra leverage.
Season the top of the burger immediately after smashing with a generous pinch of kosher salt and some black pepper. The burger is already cooking, so you want to get that seasoning on there right away.
Step 5: Don’t Touch It
Here’s the hardest part, and I’m still working on this myself. Once you’ve smashed the burger, leave it alone. Do not move it. Do not lift it to check on it. Do not mess with it. Just let it cook for about 2 to 3 minutes.
You’ll see the edges start to brown and crisp up. You might see some juices bubbling on the top surface. The smell will be absolutely incredible. This is when Sierra usually wanders outside to see what’s happening, and I have to physically block the dogs from trying to jump up near the griddle.
Step 6: The Flip
After about 2 to 3 minutes, use your metal spatula to scrape under the burger. It should release pretty easily if your griddle was hot enough. If it’s sticking, give it another 30 seconds. Flip it over and you should see a gorgeous brown crust with those crispy lacy edges.
Seriously, the first time I saw this, I actually said “oh wow” out loud to nobody. It’s that satisfying.
Season the newly exposed side with a little more salt and pepper.
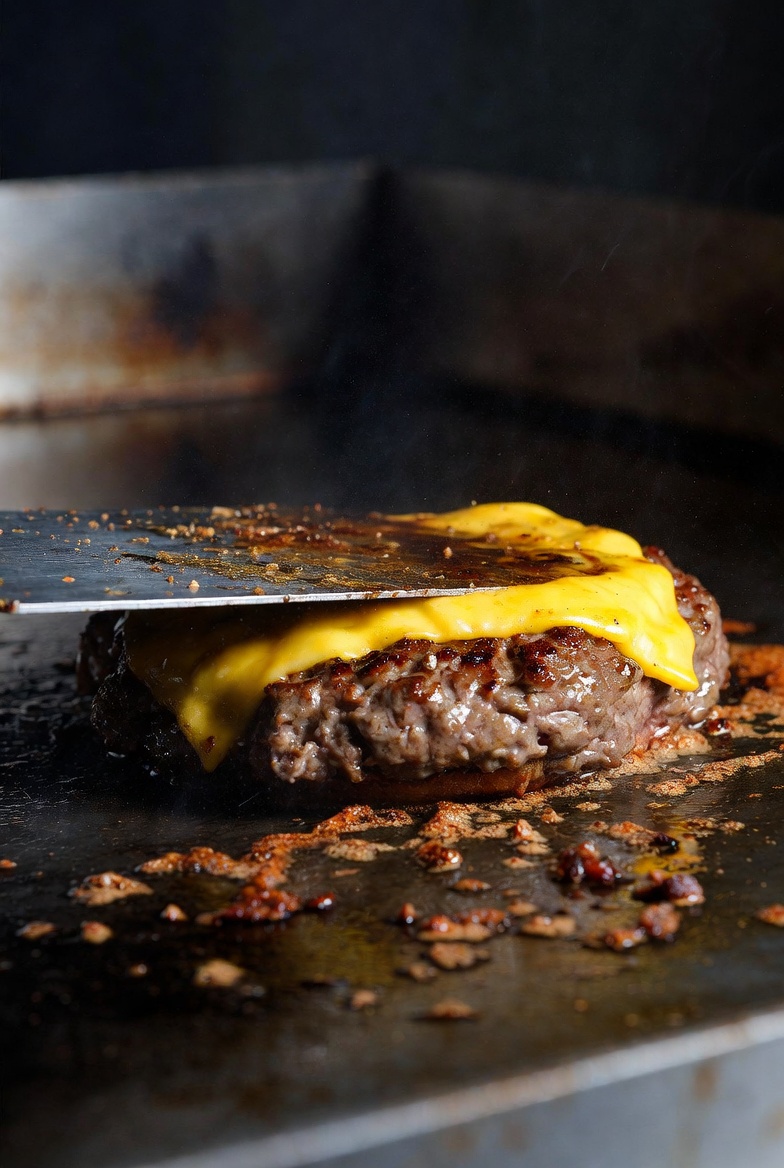
Step 7: Add Cheese and Finish Cooking
Immediately after flipping, add a slice of cheese on top of each burger. American cheese melts perfectly and quickly. Cook for another minute to 90 seconds. The burger will be done and the cheese will be melted.
If you want to speed up the cheese melting, you can use a basting dome or just a metal bowl turned upside down over the burgers. This creates a little steam chamber and melts the cheese faster. I don’t usually bother with this because the heat from the griddle melts it fine in about a minute.
Step 8: Toast the Buns
While the second side of your burgers is cooking, or right after you remove them, put your buns face-down on the griddle. Toast them for about 30 seconds until they’re golden brown. This step is non-negotiable. Toasted buns make a huge difference in the final burger experience. They hold up better to all the juices and toppings, and they add this nice textural contrast.
I butter my buns before toasting them sometimes, which Sierra thinks is overkill but I think is perfect.
Step 9: Assemble and Devour
Build your burger however you like. I go with bottom bun, sauce, burger with cheese, pickles, onions, top bun. Keep it simple or load it up, whatever makes you happy.
The first bite should give you that crispy edge, juicy interior, melty cheese, and toasted bun all in one. If you did it right, it’s going to be messy. Embrace the mess. That’s part of the experience.
Pro Tips I’ve Learned
Since I started making these a few weeks back, I’ve picked up some things that really make a difference:
- Don’t smash after the first few seconds. You only get one smash, right when the meat hits the griddle. After that, the proteins have already started to set, and smashing won’t help. In fact, it’ll just squeeze out juices and make your burger dry.
- Work in batches if needed. My 36-inch griddle can handle six burgers at once easily, but don’t crowd them. Give yourself room to work. It’s better to do two batches of four than try to cram eight on there and have them be difficult to flip.
- Keep your spatula clean. Between batches, scrape off any stuck-on bits from your spatula. You want a clean edge for sliding under the burgers.
- Double up for thicker burgers. If you want a thicker burger, make two thin smash patties and stack them. This is called a double smash burger and it’s even better than a single.
- Experiment with cheese placement. Try putting cheese between two stacked patties instead of just on top. Mind-blowing.
- Save that griddle grease. After you’re done cooking, there will be rendered fat and crispy bits all over your griddle. Use a scraper to push it all into your grease trap, but also consider sautéing some onions in all those drippings first. Game changer for topping your burgers.
Common Mistakes to Avoid
I’ve made most of these mistakes myself in my few weeks of smash burger experimentation, so learn from my errors:
Not Getting the Griddle Hot Enough
This is mistake number one. If your griddle isn’t hot enough, the meat will steam instead of sear, and you won’t get that crust. You’ll just get a gray, sad burger that sticks to the griddle. Preheat for at least 10 to 15 minutes on high heat. Don’t rush this step.
Using Lean Ground Beef
I mentioned this before but it bears repeating. 80/20 ground beef is the way. Lean beef will give you dry, flavorless burgers. The fat is your friend here.
Pre-Forming Patties
Don’t make patties ahead of time. You want loose balls of meat that you smash on the griddle. Pre-formed patties are too dense and won’t smash properly. They’ll just kind of sit there and cook like regular burger patties, which defeats the whole purpose.
Smashing Too Late
You have a very small window to smash the burger. Like two seconds max after it hits the griddle. After that, the exterior has started to cook and you’ve lost your chance. Be ready to smash immediately.
Moving the Burger Before It’s Ready
Resist the urge to lift up the burger to check on it. Just let it cook. You’ll know it’s ready to flip when the edges are deeply browned and the burger releases easily when you slide your spatula under it.
Overcooking
Smash burgers cook fast. Like, really fast. We’re talking 2 to 3 minutes per side max. Because they’re so thin, they can go from perfect to overdone in like 30 seconds. Pay attention and don’t walk away.
Variations I Want to Try
I’m still pretty new to all this, but here are some variations I’ve been thinking about experimenting with:
- Oklahoma Onion Burgers: Apparently you put thinly sliced onions on the griddle, put the beef ball on top of them, and smash the onions into the burger. They caramelize and become part of the patty. This is next on my list.
- Jalapeño Pepper Jack Version: Swap American cheese for pepper jack and add pickled jalapeños.
- Bacon Smash Burger: Cook bacon on the griddle first, then cook the burgers in the bacon fat. Stack with the crispy bacon.
- Breakfast Smash Burger: Top with a fried egg and serve on an English muffin instead of a bun.
Frequently Asked Questions
What temperature should the Blackstone be for smash burgers?
You want your Blackstone between 450 and 500 degrees Fahrenheit. This is high heat on the dial, and you should preheat for at least 10 to 15 minutes. The surface should be hot enough that water droplets instantly sizzle and evaporate.
How much ground beef per smash burger?
Use about 4 ounces of ground beef per burger, which is a quarter pound. This will smash down to a nice thin patty that’s about 4 to 5 inches across. If you want a bigger burger, stack two patties instead of making one larger one.
Do I need a burger press for smash burgers?
Nope, not required. A heavy-duty metal spatula works great. You can even use two spatulas stacked on top of each other for extra smashing power. That said, a burger press makes it easier and more consistent, and I’ve been eyeing some of the Blackstone-branded ones.
Can I make smash burgers ahead of time?
You can portion the beef balls ahead of time and keep them in the fridge, but don’t pre-smash them. The actual smashing and cooking needs to happen right when you’re ready to eat. The whole process is so fast though, like 5 to 6 minutes total, that you don’t really need to prep much in advance.
Why is my smash burger sticking to the griddle?
Either your griddle isn’t hot enough, you didn’t use enough oil, or you’re trying to flip it too early. Make sure you preheat properly, use a thin layer of oil, and wait the full 2 to 3 minutes before attempting to flip. The burger will release when it’s ready.
Should I season the meat before or after smashing?
After. Season immediately after you smash the burger onto the griddle. If you season the meat before forming the balls, you’ll start to break down the protein structure and the texture won’t be as good.
Can I use frozen ground beef?
Technically yes, but you need to fully thaw it first. Don’t try to smash frozen meat. It needs to be fresh or fully thawed to room temperature for the best results.
Cleaning Up After Smash Burgers
Okay, real talk. Smash burgers are a bit messier on your griddle than some other foods. There will be grease, crispy bits, and charred areas. Here’s what I do:
While the griddle is still hot, scrape up all the big bits with your metal spatula or a griddle scraper. Push everything into your grease trap. Then, while it’s still warm but not screaming hot, pour a little water on the surface and scrub it with your griddle scraper or a grill stone. The water creates steam that helps lift the stuck-on bits.
Once it’s mostly clean, wipe it down with paper towels. Then do a light coat of oil to protect the surface until next time. The whole cleanup process takes maybe 5 minutes, which isn’t bad considering how good the burgers are.
Final Thoughts on Blackstone Smash Burgers
Look, I’ve only been doing this for a few weeks since getting my Blackstone in April, but I genuinely think smash burgers might be my favorite thing to cook on this griddle so far. And I’ve been cooking on it constantly, trying everything I can think of. There’s something about the simplicity combined with the incredible results that just works for me.
The technique is easy to learn but has enough nuance to keep it interesting. The ingredients are basic and cheap. The results are consistently impressive. And honestly, it makes me look like a way better cook than I actually am, which is a nice bonus when friends come over.
Sierra has requested these for dinner at least three times in the past two weeks, which is saying something because she’s usually the one pushing for variety in our meals. And I’m not complaining because it gives me another excuse to fire up the Blackstone and hang out in the backyard with Bronco and Gunner going nuts around me.
If you’ve got a Blackstone and you haven’t tried smash burgers yet, bump this to the top of your list. If you don’t have a Blackstone yet and you’re thinking about getting one, just know that smash burgers alone justify the purchase. I’m not even exaggerating. These are that good.
Now if you’ll excuse me, I’m getting hungry just writing about this and I think I need to go make some burgers for lunch. The dogs are already starting to circle the back door just from hearing me talk about it.